Saturday, May 18, 2013

The Long Awaited Sideboard.........

This sideboard has been with me for quite some time and always seemed to get pushed to the back.  That might have been since it wasn't the original sideboard I was hoping to paint so beautifully with a gorgeous stained wood top......"sigh" This sideboard definitely can be categorized as a diamond in the rough and the rough went on for many many weeks.  This piece took me three and a half weeks to finish.......  She is all diamond now though!


This piece was in very rough shape when I made my husband go pick it up for me because I just had to have it.........


I ended up removing the wood veneer top and had lots of filling to do on the big middle drawer.  Now because of the damage to the wood veneer top I thought it would be easier then trying to fill it with wood filler........when people warn you that lifting veneer is a last option please listen!  Half the top came off super easy, I soaked a towel and let it sit on the top while I worked on other things and came back every hour to lift what I could.  After day three of this process I was done and just started painting, I was losing focus and needed to keep motivated.

Two coats of ASCP Paris Grey later I was ready to distress.  I didn't thin my second coat like I normally do as I wanted this piece to be textured  and to showcase the life this piece had lived.  This is my most heavily distressed piece and it is even more beautiful for it.  Every nick and bump just added more interest to the beautiful details on this piece.  I even played with the wet distressing more to showcase the texture of the paint on the drawer fronts and the side panels.


Finally I had finished the entire piece except for the top......I was dreading it having no idea what I was going to do or how I was going to get those last few pieces of veneer off.  Lucky for me my husband can be pretty awesome and while I was at work he removed those straggling pieces for me.  I still had no idea what I was going to do but the surface was ready for me.

One of my inspirations was this top by Kristy at 4 LOVE OF WOOD, I adore this layered look!


Finally tired of trying to think of the perfect finish I opened my can of stain and just went for it.  The stain didn't take how I wanted and I got a little frustrated so I decided to paint over it and it was so warm outside my paint was setting up to fast so I brushed water on top so I had a longer working time.  Were I decided to use a rag and start doing a bit of a white wash I may never know, what I do know is a was starting like what was happening.  I then hit the top with stain again and knew I finally had my finish!  I did the same process a few more times to achieve the exact layered look I wanted to and am thrilled with the end result.  This piece is so cool and I hope you all enjoy it as much as I do!

Sincerely,
Sasha


Friday, May 17, 2013

A Throw In........


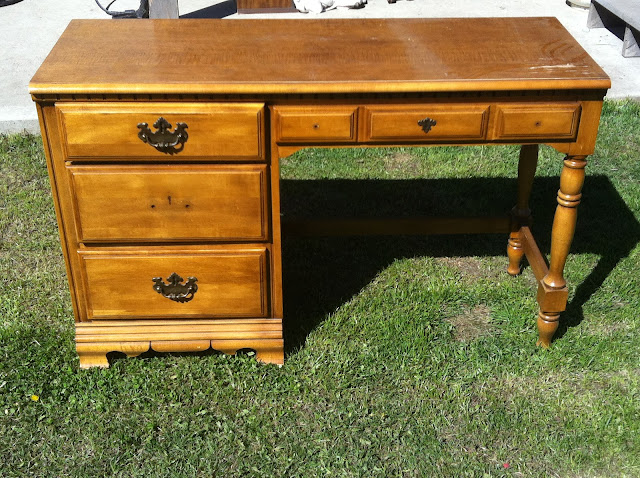
This cute little desk made by Pepplers fine furniture was actually thrown into the deal I made when buying the french provincial bedroom set.  I didn't give it much thought at first since I was caught up in the bedroom set, it snagged my attention more when I fell in love with ASCP colour Paris Grey.


As per my norm I had so many ideas I just couldn't decide at first how I wanted to finish this little gem. Since my sideboard wasn't going to end up with a beautiful stained top I decided to strip the veneer wood top and stain it.  I was a little hesitant with the stripper since you don't have much thickness to work with, and you can't leave the stripper on as long with veneer.  It ended up only taking a short time and was faster and easier then stripping a solid wood piece.  I went with a very dark stain for the top and the veneer didn't take as dark as I would have like.  It ended up working in my favour though as the original stain colour and my new stain colour created a striking duel toned top.  I applied two more coats of stain till I was happy and then did a varathane finish.


From here i just put all fears aside and jumped in with the ASCP Paris Grey and instantly fell in love with the colour and how fantastic the coverage is!  After one full power first coat I thinned the second coat.  I then broke out the ASCP Old White and hit the drawer fronts only, I really over brushed the Old White as I wanted a textured look.  I'm really happy with the end result that resembles linen. 


At first I was like well its done....... then me and the sandpaper came out and hit all the edges on one drawer and I knew right away that distressing was the way to go.  I didn't do a really heavy distress on this, just super fine on all edges it really pulled the piece together.


From the beginning I really liked the handles on this piece and leaving them as is really helped unit the piece in the end with the stained top.  I don't know about you I can see this desk in a boys room, a change table or in a front entry with a cute stool.  


Sincerely,
Sasha